2013. július 25., csütörtök

Exchange 2010 mailbox restore

Let's say you have a user who has accidentally deleted all her emails and you have no other way (but you should!) to restore them. Luckily enough, you have a full Exchange backup made by Windows Server Backup. Here is the fastest way:
1. Create C:\MyRec
2. Start WSB Recovery Wizard, select "Applications", "Exchange", select your relevant Exch backup and "Restore to other location" -> C:\MyRec
3. Navigate to your C:\MyRec\[..recovered folder..]\ mailbox folder, start an elevated command prompt and type eseutil /MH "Mailbox Database [numbers].edb"
3.a: If you  see a line "State: Dirty Shutdown" you have to do a eseutil /R E00 /i /d being in the mailbox directory above.
3.b: Do a eseutil /MH ... again and if you get a "State: Clean Shutdown" you are out of the water.
4. Unfortunately, you have to create a dedicated Recovery Database: Start an Exchange Management Shell and run: New-MailboxDatabase –Recovery –Name MyRecDB –Server MyTestServer –EDBFilePath C:\MyRec\[..recovered folder...]\"Mailbox Database [numbers].edb" –LogFolderPath C:\MyRec\[...recovered folder..]\
5: Bring online the new database with the GUI (Exchange Management Console): In the tree open Organization Configuration/Mailbox. You should see MyRecDB here with dismounted status. Mount it.


6. In the Exchange Shell, type: GetMailboxStatistics -Database -MyRecDB
7: Check if your username apears
8. Type: RestoreMailbox -Identity "Your username here from the list" -RecoveryDatabase MyRecDB and type Yes
9. Mailbox content of your user has been recovered into the root of her original mailbox. Problem solved. 

PS: I noticed that someone already made a more decent blog about this issue. I find it ubercool so you definitely want to check it out.
PS2: Get email level recovery (PST) advice here.


2013. július 19., péntek

IPSET for heavy use

What is ipset?
According to the official page: "IP sets are a framework inside the Linux 2.4.x and 2.6.x kernel, which can be administered by the ipset utility. Depending on the type, currently an IP set may store IP addresses, (TCP/UDP) port numbers or IP addresses with MAC addresses in a way, which ensures lightning speed when matching an entry against a set."
It's worth mentioning that this cool tool is mainly written by Jozsef Kadlecsik, a Hungarian Linux kernel expert.

Why and when to use ipset?
If you have plenty of IP rules in your iptables and their number is growing, one day you are going to experience a heavy performance drop. In practice if you have more than ca. ~1000-1500 rules you should worry about this. Anyway, it's more neater to use ipset above dozens of sets.

How does it work? 
You don't have to know and don't want to know. It's enough to know that it generates hashes from the rules and flipping thru these hashes is so efficient that it doesn't matter how many rules you have, the fastness of searching the whole set remains almost the same.

How to use?


For beginners

Assuming you have a modern .deb based distro, here are some simple steps.
apt-get update
apt-get install ipset

ipset create SET1 hash:net (for example)

ipset add SET1 91.83.231.25 (for example)
ipset add SET1 80.249.172.0/24 (for example)
iptables -I INPUT -m set --match-set SET1 src -j DROP (to drop all matching packets)
To save all your sets:
ipset save > backupfile
To delete:
ipset del SET1 91.83.231.25 - deletes a single line from a set
ipset flush SET1 - deletes a whole set
ipset destroy - deletes all the sets
BEFORE deleting a set you should delete the links in your iptables pointing to your set, e.g.
iptables -D INPUT -m set --match-set SET1 src -j DROP
To see your sets in different ways:
ipset -n list
ipset -t list
ipset list

To check if an IP address exists in a set:
ipset test 10.10.10.10

To restore your sets (assuming that sets in the file don't exist already)
ipset restore < mybackupfile

Some tricks

To create a new ruleset being the type of hash (thats the type because you want ipset, more info here), append some addresses to it and deny them based on the source IP address.
ipset -N set2 hash
ipset -A set2 10.10.10.0/24
ipset -A set2 80.249.172.62
iptables -A INPUT -m set --myset set2 src -j DROP
To fast delete a rule (don't forget to delete the relevant iptables rule before)
ipset -F set2
ipset -X set2 
or simply:
ipset f  
ipset x
To auto-deny a host that wants to connect to your SSH port is so simple that:
ipset -N denied hash
iptables -A INPUT -p tcp --dport 22 -j SET --add-set
denied src
iptables -A INPUT -m set --set
denied src -j DROP

To block IP addresses based on geo location (country) here is a simple shellscript:
#!/bin/sh
ipset -N geoblock nethash
for IP in $(wget -O – http://www.ipdeny.com/ipblocks/data/countries/{cn,kr,pk,tw,sg,hk,pe}.zone)
do
ipset -A geoblock $IP
done

iptables -A INPUT -m set –set geoblock src -j DROP

To auto-timeout a rule (and not generate any message if it already exists):
ipset create test hash:ip timeout 10
ipset add --exists test 91.83.231.25 120 (overwriting the default 10 seconds value)

To auto-learn a MAC address: (and define a range)
ipset create test bitmap:ip,mac range 192.168.0.0/24
ipset add test 192.168.0.1,11:11:22:22:11:11
ipset add test 192.168.0.2 (this one will auto-learn)

More advanced WAN/LAN/DMZ firewall example

We define our client (source) IPs and ports they want to communicate to. We define our server IP address and ports. We allow established tcp sessions. Here, things are getting interesting.
We allow all packets coming in my external (internet) interface heading towards to my dmz server ip address and ports. (see dst,dst. That means destination IP AND destination port. (Here HTTP and HTTPS and udp only DNS and ping [it will reply the echo].)
Then we allow our LAN clients to access the internet web based on src,dst. (source IP address and destination port). In our case, anyone in the LAN can browse the web but only 192.168.0.10 can use https.
In the last line we allow our trusted administrator to connect to tcp ports 22020 to 22022 anywhere in our system.

ipset n dmzservers hash:ip,port
ipset n mynetworks hash:ip,iface
ipset n lanusers hash:ip,port
ipset n remoteadmin hash:ip,port
ipset a dmzservers 195.195.195.195,http
ipset a dmzservers 195.195.195.195,https
ipset a dmzservers 195.195.195.195,udp:53
ipset a dmzservers 195.195.195.195,icmp:ping 
ipset a mynetworks 192.168.0.0/24,eth0
ipset a mynetworks 8.8.8.0/24,eth1
ipset a mynetworks 195.195.195.193/30,eth2 (these network definitions are not used)
ipset a lanusers 192.168.0.0/24,http
ipset a lanusers 192.168.0.10,https
ipset a remoteadmin 82.112.112.112,tcp:22020-22022
iptables -A FORWARD -m state --state ESTABLISHED,RELATED -j ACCEPT

iptables -A FORWARD -i $EXTERNAL -m set --match-set dmzservers dst,dst -m state --state NEW -j ACCEPT 
iptables -A FORWARD -i $INTERNAL -m set --match-set lanusers src,dst -m state --state NEW -j ACCEPT
iptables -A FORWARD -i $EXTERNAL -m set --match-set remoteadmin src,dst -m state --state NEW -j ACCEPT

2013. július 16., kedd

XenServer PCI Passthrough

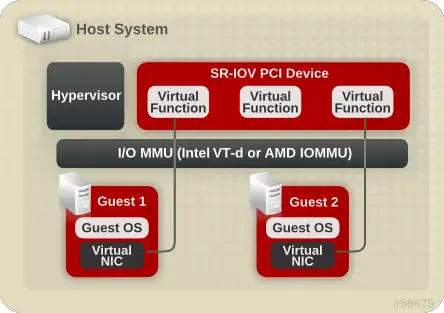
You should have heard about SR-IOV or PCI passthrough. Everything has been said about these technologies so nothing new here. This is just a simple bookmark, or, if you will, yet another copy-paste.

Xen PCI Passthrough

PCI passthrough allows you to give control of physical devices to guests: that is, you can use PCI passthrough to assign a PCI device (NIC, disk controller, HBA, USB controller, firewire controller, soundcard, etc) to a virtual machine guest, giving it full and direct access to the PCI device.
This has several potential uses, including the following:
  • One of the major overheads of virtual networking is the unavoidable overhead of copying; passing through a network card directly completely avoids this overhead.
  • Passing through graphics cards to guests allows them full access to the 3D acceleration capabilities. This can be useful not only for desktops, but also to enable Virtual Desktops for high-end CAD users, for example.
  • You can set up a Driver Domain, which can increase both security and reliability of your system. 
Pic taken from Red Hat
The whole article is at Xen wiki

2013. június 13., csütörtök

XenServer VM creation

As I promised earlier. If you want to create a new virtual machine in XenServer or XCP from an ISO file in the CLI and don't want to download it on-the-fly, here are the steps you should take.
Let's assume that you have only one 650megs cd image. Your 4 gigs size root fs will be enough to host that. If you have a dvd image or you want to store more then one cd image, it won't fit. Then, you have to create a new partition with LVM tools. So:
lvcreate -L15G -n /dev/VG_XenStorage-[PRESS_TAB_HERE]/MYISOS
mkfs.ext3 /dev/VG_XenStorage-[PRESS_TAB_HERE]/MYISOS
mkdir -p /myfiles/ && mount /dev/VG_XenStorage-[PRESS_TAB_HERE]/MYISOS /myfiles
Having done, here is the second step. Create a new Storage Repository.
xe sr-create name-label=MY-LITTLE-SR type=iso device-config:location=/myfiles/ device-config:legacy_mode=true content-type=iso
You'll see something like this cd0423d8-23db-5af4-bd70-43b60c901e17
That's the UUID of your newly created storage. Now, copy your install iso file, from example from an USB key:
cp /mnt/sdc1/CentOS-6.0-x86_64-LiveCD.iso /myfiles/
xe sr-scan uuid=cd0423d8-23db-5af4-bd70-43b60c901e17
xe cd-list 
(always use TAB!). The reply is:


 xe vm-install template=Other\ install\ media new-name-label=MY-LITTLE-VM sr-uuid=$(xe sr-list name-label="Local storage" --minimal)
a69f7844-1c4f-7e44-e072-978de5c1788c

That means you have succesfully created your VM on the disk storage named Local storage. (Default place to put VM's on.). Let's create a virtual interface for this machine and bind it to the physical interface eth0.
xe vif-create network-uuid=$(xe network-list name-label="Pool-wide network associated with eth0" --minimal) vm-uuid=$(xe vm-list name-label=MY-LITTLE-VM --minimal) device=0
It's time to create a new 25Gigs virtual disk and mount it to the VM as a Virtual Block Device.
xe vdi-create name-label=root-MY-VM sr-uuid=$(xe sr-list name-label="Local storage" --minimal) type=system virtual-size=25GiB sharable=false
xe vdb-create vdi-uuid=$(xe vdi-list name-label=root-MY-VM --minimal) vm-uuid=$(xe vm-list name-label=MY-LITTLE-VM --minimal) type=Disk bootable=true device=0
So far so good. Now, load the CD and set a new fixed RAM size, overwriting the template setting.
xe vm-cd-add vm=MY-LITTLE-VM cd-name=CentOS-6.0-x86_64-LiveCD.iso device=1
xe vm-memory-limits-set vm=MY-LITTLE-VM static-min=512MiB static-max=512MiB dynamic-min=512MiB dynamic-max=512MiB

To delegate a virtual quad-core vCPU to the VM: 
xe vm-param-set platform:cores-per-socket=4 uuid=$(xe vm-list name-label=MY-LITTLE-VM --minimal)
or set the max virtual CPUs number to 8. (That's the number that a physical quad-core can drive)
xe vm-param-set VCPUs-max=8 uuid=$(xe vm-list name-label=MY-LITTLE-VM --minimal)

Now, fire up the VM and switch to its console:
xe vm-start name-label=MY-LITTLE-VM
xe console vm=MY-LITTLE-VM
Exit the console with: CTRL+5

Sometimes it is useful to identify your virtual network cards VIFs in connection with your VMs. Remember this command:
xe vm-list is-control-domain=false params=dom-id,name-label,uuid
It will tell your VMs' domain IDs. Just watch your ifconfig output and match the VIFs' IDs (vifx.y) to your VM domains' IDs. (x is your VM, y is the device number.)
While investigating which damn vlan, bridge, vif or whatever interface bound to what and where, this is the MOST USEFUL command I've ever seen:
brctl show

2013. június 6., csütörtök

Hardening Hyper-V 2012 clusters, Deployment Bible

I've came across an awesome article, originally on http://social.technet.microsoft.com/Forums/en-US/winserverhyperv/thread/61e18aaf-de6a-42e7-aa41-3cee790a1236/. In case it disappers I'm taking an exact copy of it. I do hope it wont violate any law. :P Thanks Roger Osborne, anyway.

[...]
GENERAL (HOST):
⎕ Use Server Core, or the Windows Minimal Interface, to reduce OS overhead, reduce the potential attack surface, and to minimize reboots (due to fewer software updates).
⎕ Ensure hosts are up-to-date with recommended Microsoft updates, to ensure critical patches and updates – addressing security concerns or fixes to the core OS – are applied.
⎕ Ensure all applicable Hyper-V hotfixes and Cluster hotfixes (if applicable) have been applied. Review the following sites and compare it to your environment, since not all hotfixes will be applicable:
⎕ Ensure hosts have the latest BIOS version, as well as other hardware devices (such as Synthetic Fibre Channel, NIC’s, etc.), to address any known issues/supportability
⎕ Host should be domain joined, unless security standards dictate otherwise. Doing so makes it possible to centralize the management of policies for identity, security, and auditing. Additionally, hosts must be domain joined before you can create a Hyper-V High-Availability Cluster.
⎕ RDP Printer Mapping should be disabled on hosts, to remove any chance of a printer driver causing instability issues on the host machine.
  • Preferred method: Use Group Policy with host servers in their own separate OU
    • Computer Configuration –> Policies –> Administrative Templates –> Windows Components –> Remote Desktop Services –> Remote Desktop Session Host –> Printer Redirection –> Do not allow client printer redirection –> Set to "Enabled
⎕ Do not install any other Roles on a host besides the Hyper-V role and the Remote Desktop Services roles (if VDI will be used on the host).
  • When the Hyper-V role is installed, the host OS becomes the "Parent Partition" (a quasi-virtual machine), and the Hypervisor partition is placed between the parent partition and the hardware. As a result, it is not recommended to install additional (non-Hyper-V and/or VDI related) roles.
⎕ The only Features that should be installed on the host are: Failover Cluster Manager (if host will become part of a cluster), Multipath I/O (if host will be connecting to an iSCSI SAN, Spaces and/or Fibre Channel), or Remote Desktop Services if VDI is being used. (See explanation above for reasons why installing additional features is not recommended.)
[..]

Read the rest from on Technet or from here.

2013. május 30., csütörtök

XenServer project

Have you ever tried to create virtual machines in the CLI on a XenServer? I can assure you it can be a real pain. How the heck on earth do you attach an iso into the storage repository or why do you need to use that kickstart thingy, or whatever.
You think it's easy, just
xe sr-create name-label=Local type=iso device-config:legacy_mode=true device-config:location=/vm/iso content-type=iso 
....then copy the iso onto the server with scp, then...
xe sr-scan uuid=<SR UUID> 
xe template-list
xe vm-install new-name-label=<VM_NAME> template=<TEMPLATE NAME>
xe cd-list
 xe vm-cd-ad vm=<VM_NAME> cd-name=<NAME_ISO.iso> device=3
and finally
 xe vm-start vm=<VM-NAME>
 Hahaha. Have a look at this then.


Shorty comes the ultimate XenServer CLI VM creation howto.