A következő címkéjű bejegyzések mutatása: Network. Összes bejegyzés megjelenítése

2016. április 11., hétfő

A Mikrotik guest network can be more difficult than you may think

In recent RouterOS is a single click to set up a guest wifi AP. Saying guest I mean such a network that is fully or partly allowed to reach public internet but denied to reach the internal private network. Here is a simple howto about adding a second wifi AP/ slave interface. The only problem with that is it's unsecure. :( A most common way is using the QuickSet method. Everyone knows what to do seeing this window:
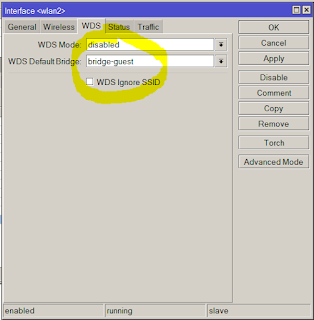
So if you I build a second AP like this:

it's going to use the same DHCP server as the internal WIFI. Obviously, because it's on the same bridge (switch) interface. I always wondered how they are still separeted by the RouterOS? The answer is Mikrotik's genius Layer2 firewall called Bridge filtering.

But you discover an embarassing problem if you have more IP subnets (e.g. VPN networks over pub net) and also want to accept the guest wifi filtering to them. One simply can't utilize Layer2 filtering over Layer3 routing and, of course, there is no work vice versa.

Soution: forget the built-in bridge and create a new bridge only for your guest wifi.
/interface bridge add name=bridge-guestwifi
Add a new security profile for guest if you happen to still doesn't have any:  
/interface wireless security-profiles add authentication-types=wpa2-psk mode=dynamic-keys name=guestwifi wpa2-pre-shared-key=topsecretpassword
Add your new slave interface:
 /interface wireless
add disabled=no mac-address=D6:CA:6E:4F:54:28 master-interface=wlan1 name=wlan2 security-profile=guest ssid="For Guests" wds-default-bridge=bridge-guestwifi
and link these 2 to each other.
/interface bridge port add bridge=bridge-guestwifi interface=wlan2

So far so good. Layer2 filtering is done now. But now the guests are totally separeted from your DHCP server so you need to create a new, dedicated DHCP pool for them. It requires a new address and subnet.
/ip address add address=192.168.100.1/24 interface=bridge-guest network=192.168.100.0
/ip pool add name=guest ranges=192.168.100.100-192.168.100.254
/ip dhcp-server add address-pool=guest disabled=no interface=bridge-guest name=guest
/ip dhcp-server network add address=192.168.100.0/24 dns-server=192.168.100.1 gateway=192.168.100.1

Lets suppose that you have such a source nating rule that nats anything that is going out to the internet:
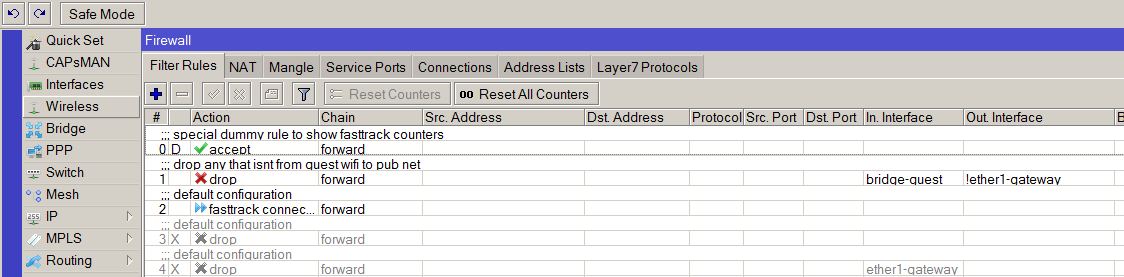
In that case we have good news. You don't have to set up any more nat rule because the guest network will hit the above rule. But it's not secured yet. The following Layer3 high priority firewall rule will take care of them:
/ip firewall filter
add action=drop chain=forward in-interface=bridge-guestwifi out-interface=!ether1-gateway
So from now on, guests are denied to go anywhere but the public internet.

2016. március 9., szerda

Ubiquiti Unify nuisances and the attack of the Martians

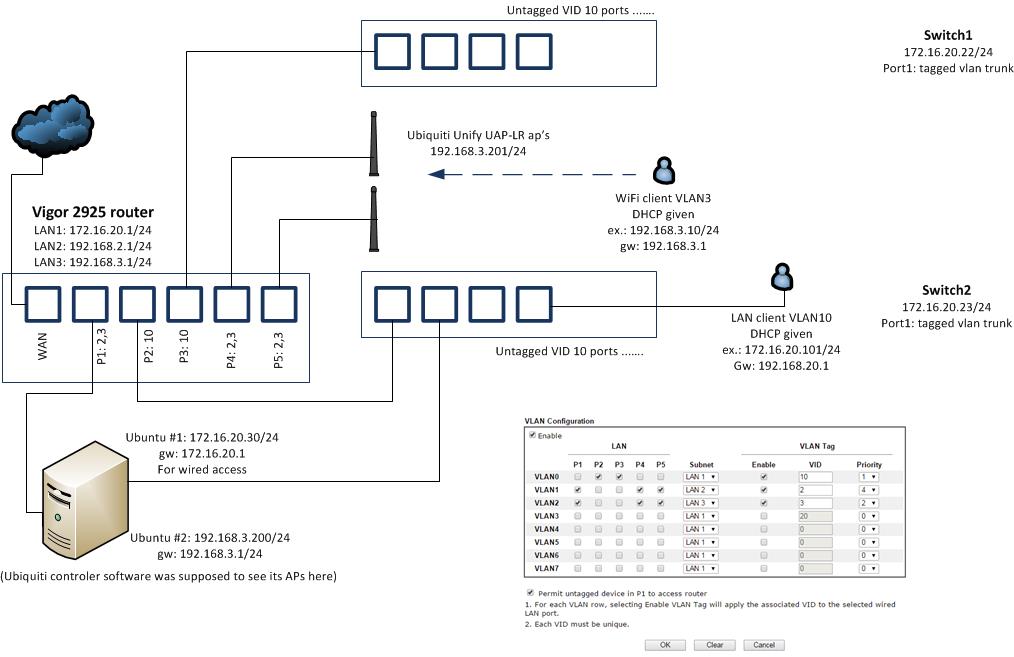
Some weeks ago I was given a nice task. A client of ours wants us to set up two new Unify APs in its network with two new wireless networks: one for guest and one for internal use. They had a Vigor 2925 to be used for firewall and DHCP role. For those who are not familiar with the wireless products named ubiquiti unify APs, here are a few links to inform:
How do I configure a "Guest Network" on UniFi AP?
Instructive reading. Based on the infos here I finally decided not to use the internal "firewall" in the APs and let the Vigor do the network separation.
UniFi - Does the controller need to be running at all times?
Official answer says "no, most of the times it is not necessary." Unfortunately this isn't entirely true with the latest firmwares. :/
No worries, since the client already had a Linux server, it looked so simple to install the controler software and setup the nodes. Sadly, everything went a different way.
For a mystical reason I couldn't make the controller software, running on the Linux, see its APs, even they were in the same subnet by their IPs and in the same broadcast domain, for the sake of Layer2 communications. I spent two days just on this riddle. Maybe it was a misconfiguration of the D-Link switches or maybe an insolvable incompatibility issue. I don't know why to this very day. :( I tried everything but the time run out so I had to find a quick solution.
So I decided to use a different network card and a second subnet on the Linux only to control the APs.
I ended up with this config:
My interfaces were:
em1       Link encap:Ethernet  HWaddr 00:25:90:xx:xx:xx
          inet addr:172.16.20.30  Bcast:172.16.20.255  Mask:255.255.255.0
          inet6 addr: fe80::225:90ff:fed3:930c/64 Scope:Link
..
em2       Link encap:Ethernet  HWaddr 00:25:90:xx:xx:xx
          inet addr:192.168.3.200  Bcast:192.168.3.255  Mask:255.255.255.0
          inet6 addr: fe80::225:90ff:fed3:930d/64 Scope:Link
..
lo        Link encap:Local Loopback
          inet addr:127.0.0.1  Mask:255.0.0.0
..

APs looked working. I think Connected(limited) state is normal in this case. Note that I didn't use the built-in "guest network" feature because it's just ridiculous.


 So everything seemed properly set. But to my greatest astonishment I coudn't reach network share of my server lying on 172.16.20.30 from my internal wifi client 192.168.3.11. When I started to ping and tcpdump'ed on the server I saw that echo requests came in but replies never went back. I thought to myself: Seeing the fact that the kernel wanted to reply on the other interface (192.168.3.x) it's hardly surprising that it didn't work.
So I set IP policy routing: if the packet comes from 192.168.3.11 on em1, reply to it on the same interface -em1- instead of em2. You know, all the iptables mangle MARK and ip route add default via 172.16.20.1 dev em1 table ... stuff, etc. etc. etc.
It didn't work either. Suddenly a light dawned on me. I turned on kernel martian packet logging with echo 1 > /proc/sys/net/ipv4/conf/all/log_martians
and VOILA I saw:

Mar  2 20:08:03 superserver kernel: [ 2755.407570] IPv4: martian source 192.168.3.11 from 192.168.3.200, on dev em1
Mar  2 20:08:03 superserver kernel: [ 2755.407590] ll header: 00000000: ff ff ff ff ff ff 00 25 90 d3 93 0d 08 06        .......%......
Mar  2 20:08:04 superserver kernel: [ 2756.424025] IPv4: martian source 192.168.3.11 from 192.168.3.200, on dev em1
Mar  2 20:08:04 superserver kernel: [ 2756.424048] ll header: 00000000: ff ff ff ff ff ff 00 25 90 d3 93 0d 08 06        .......%......
Mar  2 20:08:05 superserver kernel: [ 2757.421639] IPv4: martian source 192.168.3.11 from 192.168.3.200, on dev em1
Mar  2 20:08:05 superserver kernel: [ 2757.421661] ll header: 00000000: ff ff ff ff ff ff 00 25 90 d3 93 0d 08 06        .......%......

It's a bit confusing isn't it ?!?! 192.168.3.200 is my own server!
I tried to turn off the Martian protection with echo 0 > /proc/sys/net/ipv4/conf/all/rp_filter
but I learned: such a bad routing problem can not be solved with a simple fix like this.
I was thinking very hard for an hour and finally I faked the kernel with an another subnet set on my second interface:

auto em2
iface em2 inet static
    address 192.168.3.200
    netmask 255.255.255.192


Now it's working as expected:
root@:/# route -n
Kernel IP routing table
Destination     Gateway         Genmask         Flags Metric Ref    Use Iface
0.0.0.0         172.16.20.1     0.0.0.0         UG    0      0        0 em1
172.16.20.0     0.0.0.0         255.255.255.0   U     0      0        0 em1
192.168.3.192   0.0.0.0         255.255.255.192 U     0      0        0 em2

These were all done on a:
Linux 3.11.0-12-generic #19-Ubuntu SMP Wed Oct 9 16:20:46 UTC 2013 x86_64 x86_64 x86_64 GNU/Linux

2015. augusztus 19., szerda

ntopng install on Debian Sqeeze

If you are careless enough to just follow a step-by-step tutorial like this being on a good old Squeeze you surely will end up with a failing and buggy ntopng. E.g. you won't be able to see your newly created users (users tab is totally empty: No Results Found)
Looks somewhat broken
or can not switch between your monitored interfaces. If you start ntopng from shell you may see something like this:
19/Aug/2015 13:28:28 [src/Redis.cpp:170] ERROR: ERR unknown command 'HSET' [HSET ntopng.host_labels ]
19/Aug/2015 13:28:30 [src/Redis.cpp:148] ERROR: ERR unknown command 'HGET'
19/Aug/2015 13:28:36 [src/Redis.cpp:148] ERROR: ERR unknown command 'HGET'

This whole thing is because your Redis installation is out of date. Another nice thing in Debian Squeeze is its repositories includes Version: 2:1.2.6-1 Redis. Simply fix that with:
echo "deb http://backports.debian.org/debian-backports squeeze-backports main" >> /etc/apt/sources.list
apt-get update
apt-get -t squeeze-backports install redis-server

Now it is:
redis-server                       2:2.4.15-1~bpo60+2    
How to reset your forgotten ntopng admin password.
You might don't want to bother with compiling ntopng-2.0 packages on a simple standard Squeeze. In that case here are the x64 and x86 versions. You're welcome.

2015. március 6., péntek

How to intall smokeping - the only way it works :)

What is smokeping? That's a powerful network monitoring tool which works mainly with tricky ICMP pings and also able to do special TCP and UDP port connection tests built-in. You can check your statistics on web based graphs.

How to install it? There are blogs that discusses the process but I strongly recommend not to follow them word for word because they suffer from serious errors that keep you from succeeding. Happily you are here, at the perfect place for the perfect tutorial!

What is a master and slave configuration?
Master is actually your central smokeping server. It periodically checks the hosts you configured to monitor. Nothing surprising, ehm ? Let's look at the slave(s) then. They check BACK to the master (or any other configured host) and send their results BACK to the master who process their data and displays the results together with its normal monitoring data.

Okay, let's install my master Debian/Ubuntu node first. I'm going to create two logical units inside my monitoring tree. I'll call the first "External hosts" and the second (guess what) "Internal hosts".

MASTER node
------
apt-get update
apt-get install smokeping
Check if /etc/default/smokeping has only ONE active line: "MODE=master"
cd /etc/smokeping/
touch slave-secrets
You define here your SLAVE servers individual passwords. In my case I will have two slave (also active checking) servers in my "External hosts", see later.
cat /etc/smokeping/slave-secrets
mywebserver:topsecr3t
myftpserver:topsecr3t
echo "topsecr3t" > slavesecrets.conf
chmod 660 slave-secrets
chmod 600 slavesecrets.conf
chown smokeping:www-data slave-secrets slavesecrets.conf
cd config.d/
cat Alerts
*** Alerts ***
to = me.admin@mydomain.com
from = smokeping@mydomain.com

[...others are remain the same default...]
cat Database
*** Database ***

step     = 200
pings    = 100

[...others are remain the same default...]
These two variables are changed because I want to check my hosts in every 200 seconds with 100 ping packets.
cat General
*** General ***

owner    = Me.Da.Admin
contact  = me.admin@mydomain.com
mailhost = localhost
# NOTE: do not put the Image Cache below cgi-bin
# since all files under cgi-bin will be executed ... this is not
# good for images.
cgiurl   = http://localhost/cgi-bin/smokeping.cgi
[...others are remain the same default...]
 cat Probes
*** Probes ***

+ FPing

binary = /usr/bin/fping
packetsize = 500
pings = 100
step = 200
timeout = 1.5
[...others are remain the same default...]
Several other parameters can be used, see later.
 cat Slaves
*** Slaves ***
secrets=/etc/smokeping/slave-secrets

+mywebserver
display_name=My Great webserver
color=ff0000

+myftpserver
display_name=My Super FTP server
color=00b7e2

I've defined here my slave servers. NOT those hosts I want to check. Don't be confused: these two categories are totaly different!
cat Targets
 *** Targets ***
probe = FPing

menu = Top
title = Network Latency Grapher
remark = Welcome to my little SmokePing website.

+ External
menu = External hosts
title = Ext

++ mywebserver
menu = My Superb Webserver
host = 10.243.43.6

++ myftpserver
menu = My gorgeos ftpserver
host = 172.16.29.253

++ mysmokeping
menu = this.server
host = 195.95.95.95
slaves = mywebserver myftpserver

+Internal
menu = Interal hosts
title = Gateways

++ MyGateway
menu = My Little Cisco Switch
host = 172.16.21.254

I've set the most important things here: my monitored hosts. Probe type is simple fping. Two units here: External and Internal. Their friendly name will shown in the web menu as "External hosts" and "Internal hosts". External has 3 hosts inside it: two external servers and the monitor server itself. mywebserver and myftpserver HAVE to be the same string as the servers identifies themselves! (as they answer to the "hostname" shell command) ++mysmokeping section MUST HAVE the "slaves = mywebserver myftpserver" line. If you don't have it, the slaves are going to reply with the unpleasant message
"ERROR: we did not get config from the master. Maybe we are not configured as a slave for any of the targets on the master ?"
/etc/init.d/smokeping restart
If you can't see any useful answer to this :) you may find this command profitable: journalctl -xn

Wait some minutes and point your browser to http://195.95.95.95/smokeping/smokeping.cgi

And! Here is the point for slaves: set your file rights according to the following:
/var/lib/smokeping# ls -sal
[...]
4 drwxrwx---  2 smokeping www-data  4096 Mar  6 13:05 External
cd smokeping/
chown smokeping:www-data *
chmod 755 *
This is a MUST to let the Slaves able to POST their data to apache running on your smokeping master.

SLAVE nodes
-----
apt-get install smokeping
cat /etc/default/smokeping
MODE=slave
MASTER_URL=http://195.95.95.95/cgi-bin/smokeping.cgi
SHARED_SECRET=/etc/smokeping/slavesecrets.conf

Note that this is considerably unsecure configuration. Use VPN connections, firewalls or other type of http authentication,in .htaccess for example. The above 3 lines you have to have, no more or less.
echo "topsecret" > /etc/smokeping/slavesecrets.conf
ls -sal /etc/smokeping/slavesecrets.conf
Set file rights as:
-r--r-----  1 smokeping root   13 Mar  6 07:41 slavesecrets.conf

All the other files are needless here. You can safely delete the whole config.d/ directory for example. Nice, huh?
/etc/init.d/smokeping restart
 Wait some minutes and watch your slave-driven data flow under your "External" session on your Master's webpage.
In case anything going wrong - or nothing, check your apache error log:
cat /var/log/apache/error.log

Check the online manual for further reference.