A következő címkéjű bejegyzések mutatása: Linux. Összes bejegyzés megjelenítése

2019. április 1., hétfő

Systemd services command cheatsheet

List of all services and their status:
service --status-all
Another way:
systemctl list-units --type service --all  
 
List just the enabled services 
systemctl list-units --type service   
or systemctl -l –type service –all
 
Stop/Start/Restart a service 
systemctl restart/start yourservicename
 
Enable/Disable the startup of a service at boot time
systemctl enable/disable yourservicename 
 
Is it enabled? 
systemctl is-enabled yourservicename
 
Uninstall/wipe a service 
rm /etc/systemd/system/yourservicename
systemctl daemon-reload
systemctl reset-failed
 
Find out the dependencies: 
systemctl list-dependencies --type service
 
Get the files related to the service:
locate yourservicename.service 

Disable the service and forbids the others from start it
systemctl mask yourservicename

list systemd unit files and their states (enabled/disabled/etc)
systemctl list-unit-files 

To see / set the default runlevel of the system
systemctl get-defaults (set-defaults)
e.g. multi-user.target or graphical.target

systemctl isolate 
explained: (stolen from internet)
The word "isolate" means run the requested unit, and make sure nothing else is running (with a few exceptions.) Since runlevels have been replaced by targets (which are more or less just a set of services that you want to be running in a certain situation, like for multi-user or graphical usage), you can switch to a "runlevel" by starting the equivalent target and stopping anything that is not part of the new target - using isolate.
systemctl isolate multi-user.target is the modern way to unload the graphic shell, which was done by init 3 previously.   You are in runlevel 5 or to be precise in graphical.target. You do runlevel 3 or systemctl isolate multiuser.target.

Another way to change target runlevel.
systemctl set-default multi-user.target (then reboot)


2018. július 24., kedd

MySQL monitoring with Zabbix 3.4

If you install Zabbix Server 3.4 there is a nice template supplied with it which is called "    Template DB MySQL". That could be used for monitoring remote MySQL database performance. Unfortunately this will also not work out of the box... Your logs will get filled by " Error connecting to database: Access denied for user 'zabbix'@'localhost' to database" and...

So you should first create a database on a _remote_ mysql server for the sake of zabbix. This could be painful if security is a high concern for you but actually doesn't hold much risk.

mysql -u root -p
use mysql;
CREATE DATABASE `zabbix_db`;
GRANT ALL PRIVILEGES ON zabbix_db.* TO 'zabbixagent'@'localhost' IDENTIFIED BY 'XXXXXXYYX';
FLUSH PRIVILEGES;


 Then create the required config files:
mkdir /var/lib/zabbix # this is defined in /etc/zabbix/zabbix_agentd.conf.d/userparameter_mysql.conf file. You must have it.
cd  /var/lib/zabbix
touch .my.cnf
chown zabbix:zabbix /var/lib/zabbix -R
chmod 600 .my.cnf

And here is the secret magic: its content should be:
[mysql]
user=zabbixagent
password=XXXXXXXXXXYYX
[mysqladmin]
user=zabbixagent
password=XXXXXXXXXXYYX

Note: no special rights needed for zabbixuser for "mysqladmin". In this way all errors should be gone and you have a nice and clean MySQL performance monitoring. Tadaam.


2018. július 23., hétfő

Zabbix agent upgrade from 2.x to 3.4

It's not easy as it seems. After you execute the first steps...
wget http://repo.zabbix.com/zabbix/3.4/ubuntu/pool/main/z/zabbix-release/zabbix-release_3.4-1+xenial_all.deb
dpkg -i zabbix-release_3.4-1+xenial_all.deb
apt update
apt install zabbix-agent -y

You suddenly realize that something is definitely wrong because the agent dies.

Jul 23 14:52:22 sss systemd[1]: Failed to start Zabbix Agent.
Jul 23 14:52:22
sss systemd[1]: zabbix-agent.service: Unit entered failed state.
Jul 23 14:52:22
sss systemd[1]: zabbix-agent.service: Failed with result 'exit-code'.
dpkg: error processing package zabbix-agent (--configure):
 subprocess installed post-installation script returned error exit status 1
Processing triggers for libc-bin (2.23-0ubuntu10) ...
Processing triggers for systemd (229-4ubuntu21.2) ...
Processing triggers for ureadahead (0.100.0-19) ...
Errors were encountered while processing:
 zabbix-agent
E: Sub-process /usr/bin/dpkg returned an error code (1)


Some investigation shows /etc/zabbix/zabbix_agentd.conf.d directory does not exists and that's where the new agent looks for its configs and foolishly it does not create it. But you may have existing userparameter configs in existing /etc/zabbix/zabbix_agentd.d so the best way to continue the installation with:
ln -s /etc/zabbix/zabbix_agentd.d /etc/zabbix/zabbix_agentd.conf.d
service zabbix-agent restart
service zabbix-agent status


2018. március 26., hétfő

Systemd over NTP

Ever wondered how to setup an NTP client controlled by systemd? Here are some short steps.
Symptom:

Mar 26 19:24:43 lokalhost systemd-timesyncd[403]: Timed out waiting for reply from 118.189.177.157:123 (0.debian.pool.ntp.org).
Mar 26 19:24:54 lokalhost systemd-timesyncd[403]: Timed out waiting for reply from 103.47.76.177:123 (0.debian.pool.ntp.org).
Mar 26 19:25:04 lokalhost systemd-timesyncd[403]: Timed out waiting for reply from 128.199.123.83:123 (0.debian.pool.ntp.org).
Mar 26 19:25:14 lokalhost systemd-timesyncd[403]: Timed out waiting for reply from 139.59.219.101:123 (0.debian.pool.ntp.org).
Mar 26 19:25:24 lokalhost systemd-timesyncd[403]: Timed out waiting for reply from 202.156.0.34:123 (1.debian.pool.ntp.org).
Mar 26 19:25:35 lokalhost systemd-timesyncd[403]: Timed out waiting for reply from 128.199.87.57:123 (1.debian.pool.ntp.org).
Mar 26 19:25:45 lokalhost systemd-timesyncd[403]: Timed out waiting for reply from 128.199.169.185:123 (1.debian.pool.ntp.org).
Mar 26 19:25:55 lokalhost systemd-timesyncd[403]: Timed out waiting for reply from 103.23.208.175:123 (1.debian.pool.ntp.org).
Mar 26 19:26:05 lokalhost systemd-timesyncd[403]: Timed out waiting for reply from 172.104.55.191:123 (2.debian.pool.ntp.org).


Solution:
1. nano /etc/systemd/timesyncd.conf
2. Set your NTP server, e.g.: NTP=172.16.36.67
3. systemctl restart systemd-timesyncd.service 
4. timedatectl set-ntp true
5. Check with: timedatectl status


2017. október 4., szerda

A returning to this blog

Just a small script to myself to remember. An elegant and playful way to internally daily backup a jira+confluence+gitlab machine - and avoid all the "unlikely happen" risks.

#!/bin/bash
BACKUPLOG=/var/log/backuplog
exec >  >(tee -ia $BACKUPLOG)
exec 2> >(tee -ia $BACKUPLOG >&2)
if [ ! -f /backup/MOUNTED ]; then  # temp solution for further use
    echo FATAL_BACKUP_NOT_MOUNTED >> $BACKUPLOG
    exit 1
fi

date
echo BACKUP_STARTED

# CONFLUENCE
MYPATH=/var/lib/confluence/backups
FILE=backup-`date +%F|sed 's/-/_/g'`
cp $MYPATH/$FILE.zip /backup/confluence
[[ `ls $MYPATH|wc -l` -gt 15 ]] && find $MYPATH -mtime +15 -delete # purge old backups only if there are new ones !
[[ `ls /backup/confluence|wc -l` -gt 60 ]] && find /backup/confluence/ -type f -mtime +60 -delete

#JIRA
MYPATH=/var/lib/jira/export/
# another nice way
rsync -avh $MYPATH /backup/jira/ # no autodelete!
[ $? -ne 0 ] && echo RSYNC_ERROR_IN_BACKUP # temp set for further use
[[ `ls $MYPATH|wc -l` -gt 41 ]] && find $MYPATH -type f -mtime +20 -delete # 2 backups daily! purge old backups only if there are new ones !
[[ `ls /backup/jira|wc -l` -gt 120 ]] && find /backup/jira -mtime +60 -delete
tar -czf /backup/jira/$FILE-data.tgz /var/lib/jira/data

# MYSQL SIMPLE MIRROR BACKUP
rsync -avh --delete /var/lib/automysqlbackup/ /backup/mysql/
sleep 3

# GITLAB
/opt/gitlab/bin/gitlab-rake gitlab:backup:create
sleep 3
mv /var/opt/gitlab/backups/* /backup/gitlab/

# etc
rdiff-backup /etc /backup/etc
rdiff-backup --remove-older-than 4W /backup/etc
echo BACKUP_ENDED
date

2016. szeptember 19., hétfő

Connect your Jira instance to a HipChat

Last year I got the chance to manage an Atlassian Jira and Confluence server. That was fun so far. But last week I was given a new task: fire up a HipChat instance and connect it with Jira. I wasted some days figuring out what to do with that exactly so to anyone getting here with Google: you are so lucky that I can tell you everything that you never find in any Atlassian docs. Here are the steps I have done.
1: download your HipChat  VM instance and import it to a Vmware host. (Change RAM, NIC etc. settings according your needs.)
2: Start, login with admin / hipchat into your console (to su, type: sudo /bin/dont-blame-hipchat)
3: Set your fix IP networking with such a command:  hipchat network -m static -i 192.168.100.20 -s 255.255.255.0 -g 192.168.100.254 -r 192.168.100.254
4: Open your /etc/hosts for edit and enter: 192.168.100.20 hipchat hipchat.mynetwork.local
5: In your nameserver set a new record for hipchat, e.g. hipchat.mynetwork.local (192.168.100.20)
6/a: generate a self signed SSL certificate
6/b: request a certificate from an external cert provider (see below *)
7: Finish your HC install using your (trial) licence and this certificate. (Certificate and hostname can be changed later)
8: Install HipChat connect Add-On in your Jira
9: Here comes the tricky part that drove me nuts. One can't simply force Jira connect to Hipchat because of Java engine in Jira won't trust HipChat's cert by default. You will notice that if you check catalina.out logfile in Jira: cat /opt/atlassian/jira/logs/catalina.out :
 /rest/hipchat/integration/latest/installation/complete [c.a.p.hipchat.rest.HipChatLinkResource] javax.net.ssl.SSLHandshakeException: sun.security.validator.ValidatorException: PKIX path building failed: sun.security.provider.certpath.SunCertPathBuilderException: unable to find valid certification path to requested target javax.net.ssl.SSLHandshakeException: sun.security.validator.ValidatorException: PKIX path building failed: sun.security.provider.certpath.SunCertPathBuilderException: unable to find valid certification path to requested target

So you have two choices.
First: manually add your cert to the trusted java store. Get your server public key, detailed here. Once got your pub key into a file, execute this command: (check your paths ofcoz')
/opt/atlassian/jira/jre/bin/keytool -import -alias hipchat.mighty.org -keystore /opt/atlassian/jira/jre/lib/security/cacerts -file /certs/mypubhipchat.crt
It asks you for a password. What the heck, what kind of password, you might ask! That is the default password for Java cert storage and hopefully nobody changed it in your system, so enter: changeit for password.

Second method: install SSL for Jira add-on. It's easier.

See attached srceenshot: it assists you installing the server cert. It creates an updated but temporary java keystore file and you have to copy it in place of the production keystore later and then restart the whole Jira.

10. Success ! (almost..)


* 7/b: in this case you'll need an external FQDN so have to own a domain name. So for example if you own mighty.org domain name, do the following:
- create a CSR for hipchat.mighty.org with your favorite linux home system.
- request a trusted certificate at a trusted 3rd party cert provider for hipchat.mighty.org
- in your INTERNAL(!) nameserver, create a new zone called hipchat.mighty.org and assing 192.168.100.20 to its @ value.


2016. június 27., hétfő

File access auditing on a Windows fileserver: Data Leakage Prevention

Here is a clever script concept that helps company managers notifying someone's unusual amount of file reading. That's typical behaviour for an employee who is intended to quit and try to steal all the files of that company. Such auditing softwares are on the market for several hundred or thousand bucks!
Luckily for you, I've written one in bash. OK that's not good news for ones who use only Windows. But it can be easily portable to any script language, for example, php so that it could be run directly in the Windows fileserver or DC by installing the proper runtime enviroment. (PHP, ruby, python, etc.)
Exploring that thought further, now I'm going to translate that for myself. ;) But for now, it's enough to get it work in bash.

The original idea is that we suppose that all the users open almost the same amount of files daily on their daily routines. This script always alerts when a statistical threshold percent reached per user.
In the following example you are going to see a nice solution for lab use in which I transfer the logfile from the Windows server to a Linux server to be able to run the bash script on it. You can find detailed comments inside the script.

Step-by-step installation:
1: Enable audit log policy on your Windows Server, assign it to the target folders and test it
(Note: in the above blog you can find an advanced example. In my case I look for event id 4663 because it just contains the information I need.) Set the audit rules according to your needs. The less eventrule the better. We need to trace file reads so the first rule is a must.


2: You need to export the specific events from the security log to a plain file. So create a getsec.ps1 file in c:\script\ with the following content:
Get-EventLog security -After (Get-Date).AddDays(-1) -InstanceId 4663 |select Message|ft -AutoSize -Wrap > c:\auditing\report.txt
3: Also, don't forget to create that c:\auditing folder and then put an empty file into it named: mounted

 4: Schedule the script to run at the end of the working hours or at midnight. The command is to be: (e.g.) C:\Windows\System32\WindowsPowerShell\v1.0\powershell.exe and the argument (e.g.): -executionpolicy bypass -file c:\scripts\getsec.ps1  2>&1 > C:\scripts\log.txt
5: Share c:\auditing folder with a dedicated user that is intended to be used only by the Linux server, e.g.: linuxsrv
6: On your linux box, install the following packages: cifs-utils dos2unix mutt iconv
7: Test your connection:
 [ -f /mnt/mounted ] || mount.cifs //192.168.xx.xx/auditing/ /mnt/ -o username=linuxsrv,password=Sup3rS3cur3P4$$,domain=contoso
8: Create the base directories in, e.g.
mkdir /root/auditor && cd /root/auditor
mkdir archive average stat users; echo "0" > counter

Having succeeded, congratulations, now you are ready to track your file access activity and watch out for possible data stealing FOR FREE!


Here is the mighty script. See comments inline!

2016. május 19., csütörtök

GlusterFS in a simple way

Here is the story how I managed to install a 2 node glusterfs on CentOS and one client for test purposes.
In my case the hostnames and the IPs were:

192.168.183.235 s1
192.168.183.236 s2
192.168.183.237 c1

Append these to the end of /etc/hosts to make sure that simple name resolution will work.
Execute the followings on both servers.

rpm -ivh  http://dl.fedoraproject.org/pub/epel/7/x86_64/e/epel-release-7-5.noarch.rpm 
wget  -P /etc/yum.repos.d http://download.gluster.org/pub/gluster/glusterfs/3.7/3.7.5/CentOS/glusterfs-epel.repo 
yum -y install glusterfs glusterfs-fuse glusterfs-server

It's no need to install any of samba packages if you don't intend to use smb.

systemctl enable glusterd.service
Created symlink from /etc/systemd/system/multi-user.target.wants/glusterd.service to /usr/lib/systemd/system/glusterd.service.

Both servers had a second 20G capacity disk named sdb. I created two LV's for two bricks.

[root@s2 ~]# lvcreate -L 9G -n brick2 glustervg
 Logical volume "brick2" created.
[root@s2 ~]# lvcreate -L 9G -n brick1 glustervg
 Logical volume "brick1" created.
[root@s1 ~]# vgcreate glustervg /dev/sdb
 Volume group "glustervg" successfully created
[root@s1 ~]# lvcreate -L 9G -n brick2 glustervg
 Logical volume "brick2" created.
[root@s1 ~]# lvcreate -L 9G -n brick1 glustervg
 Logical volume "brick1" created.
[root@s2 ~]# pvdisplay

  --- Physical volume ---
  PV Name               /dev/sdb
  VG Name               glustervg
  PV Size               20.00 GiB / not usable 4.00 MiB
  Allocatable           yes
  PE Size               4.00 MiB
  Total PE              5119
  Free PE               511
  Allocated PE          4608
  PV UUID               filZyX-wR7W-luFX-Asyn-fYA3-f7tf-q4xGyU
[...]

[root@s2 ~]# lvdisplay

  --- Logical volume ---
  LV Path                /dev/glustervg/brick2
  LV Name                brick2
  VG Name                glustervg
  LV UUID                Rx3FPi-S3ps-x3Z0-FZrU-a2tq-IxS0-4gD2YQ
  LV Write Access        read/write
  LV Creation host, time s2, 2016-05-18 16:02:41 +0200
  LV Status              available
  # open                 0
  LV Size                9.00 GiB
  Current LE             2304
  Segments               1
  Allocation             inherit
  Read ahead sectors     auto
  - currently set to     8192
  Block device           253:3

  --- Logical volume ---
  LV Path                /dev/glustervg/brick1
  LV Name                brick1
  VG Name                glustervg
  LV UUID                P5slcZ-dC7R-iFWv-e0pY-rvyb-YrPm-FM7YuP
  LV Write Access        read/write
  LV Creation host, time s2, 2016-05-18 16:02:43 +0200
  LV Status              available
  # open                 0
  LV Size                9.00 GiB
  Current LE             2304
  Segments               1
  Allocation             inherit
  Read ahead sectors     auto
  - currently set to     8192
  Block device           253:4
[...]


[root@s1 ~]# lvdisplay
  --- Logical volume ---
  LV Path                /dev/glustervg/brick2
  LV Name                brick2
  VG Name                glustervg
  LV UUID                7yC2Wl-0lCJ-b7WZ-rgy4-4BMl-mT0I-CUtiM2
  LV Write Access        read/write
  LV Creation host, time s1, 2016-05-18 16:01:56 +0200
  LV Status              available
  # open                 0
  LV Size                9.00 GiB
  Current LE             2304
  Segments               1
  Allocation             inherit
  Read ahead sectors     auto
  - currently set to     8192
  Block device           253:2

  --- Logical volume ---
  LV Path                /dev/glustervg/brick1
  LV Name                brick1
  VG Name                glustervg
  LV UUID                X6fzwM-qdRi-BNKH-63fa-q2O9-jvNw-u2geA2
  LV Write Access        read/write
  LV Creation host, time s1, 2016-05-18 16:02:05 +0200
  LV Status              available
  # open                 0
  LV Size                9.00 GiB
  Current LE             2304
  Segments               1
  Allocation             inherit
  Read ahead sectors     auto
  - currently set to     8192
  Block device           253:3
[...]
 

[root@s1 ~]# mkfs.xfs /dev/glustervg/brick1
 

meta-data=/dev/glustervg/brick1  isize=256    agcount=4, agsize=589824 blks
         =                       sectsz=4096  attr=2, projid32bit=1
         =                       crc=0        finobt=0
data     =                       bsize=4096   blocks=2359296, imaxpct=25
         =                       sunit=0      swidth=0 blks
naming   =version 2              bsize=4096   ascii-ci=0 ftype=0
log      =internal log           bsize=4096   blocks=2560, version=2
         =                       sectsz=4096  sunit=1 blks, lazy-count=1
realtime =none                   extsz=4096   blocks=0, rtextents=0


[root@s1 ~]# mkfs.xfs /dev/glustervg/brick2

meta-data=/dev/glustervg/brick2  isize=256    agcount=4, agsize=589824 blks
         =                       sectsz=4096  attr=2, projid32bit=1
         =                       crc=0        finobt=0
data     =                       bsize=4096   blocks=2359296, imaxpct=25
         =                       sunit=0      swidth=0 blks
naming   =version 2              bsize=4096   ascii-ci=0 ftype=0
log      =internal log           bsize=4096   blocks=2560, version=2
         =                       sectsz=4096  sunit=1 blks, lazy-count=1
realtime =none                   extsz=4096   blocks=0, rtextents=0


[root@s1 ~]# mkdir -p /gluster/brick{1,2}
[root@s2 ~]# mkdir -p /gluster/brick{1,2}
[root@s1 ~]# mount /dev/glustervg/brick1 /gluster/brick1 && mount /dev/glustervg/brick2 /gluster/brick2
[root@s2 ~]# mount /dev/glustervg/brick1 /gluster/brick1 && mount /dev/glustervg/brick2 /gluster/brick2


Add the following to a newline in both /etc/fstab:


/dev/mapper/glustervg-brick1 /gluster/brick1 xfs rw,relatime,seclabel,attr2,inode64,noquota 0 0
/dev/mapper/glustervg-brick2 /gluster/brick2 xfs rw,relatime,seclabel,attr2,inode64,noquota 0 0


[root@s1 etc]# systemctl start glusterd.service

Making sure:
[root@s1 etc]# ps ax|grep gluster

 1010 ?        Ssl    0:00 /usr/sbin/glusterd -p /var/run/glusterd.pid --log-level INFO[root@s1 etc]# gluster peer probe s2
peer probe: success.


[root@s2 etc]# gluster peer status
Number of Peers: 1
Hostname: 192.168.183.235
Uuid: f5bdc3f3-0b43-4a83-86c1-c174594566b9
State: Peer in Cluster (Connected)


[root@s1 etc]# gluster pool list
UUID                                    Hostname        State
01cf8a70-d00f-487f-875e-9e38d4529b57    s2              Connected
f5bdc3f3-0b43-4a83-86c1-c174594566b9    localhost       Connected

[root@s1 etc]# gluster volume status
No volumes present

[root@s2 etc]# gluster volume info
No volumes present

[root@s1 etc]# mkdir /gluster/brick1/mpoint1
[root@s2 etc]# mkdir /gluster/brick1/mpoint1
[root@s1 gluster]# gluster volume create myvol1 replica 2 transport tcp s1:/gluster/brick1/mpoint1 s2:/gluster/brick1/mpoint1

volume create: myvol1: failed: Staging failed on s2. Error: Host s1 is not in 'Peer in Cluster' state

Ooooops....
[root@s2 glusterfs]# ping s1ping: unknown host s1I forgot to check name resolution. When i fixed this and tried to create it again, i got:
[root@s1 glusterfs]# gluster volume create myvol1 replica 2 transport tcp s1:/gluster/brick1/mpoint1 s2:/gluster/brick1/mpoint1
volume create: myvol1: failed: /gluster/brick1/mpoint1 is already part of a volume
 
 WTF ??
[root@s1 glusterfs]# gluster volume get myvol1 all
volume get option: failed: Volume myvol1 does not exist
[root@s1 glusterfs]# gluster
gluster>
exit         global       help         nfs-ganesha  peer         pool         quit         snapshot     system::     volume
gluster> volume
add-brick      bitrot         delete         heal           inode-quota    profile        remove-brick   set            status         tier
attach-tier    clear-locks    detach-tier    help           list           quota          replace-brick  start          stop           top
barrier        create         get            info           log            rebalance      reset          statedump      sync

gluster> volume l
list  log
gluster> volume list
No volumes present in cluster

That's odd! Hmm. I thought it'd work: 
[root@s1 /]# rm /gluster/brick1/mpoint1
[root@s1 /]# gluster volume create myvol1 replica 2 transport tcp s1:/gluster/brick1/mpoint1 s2:/gluster/brick1/mpoint1volume create: myvol1: success: please start the volume to access data

[root@s1 /]# gluster volume list

myvol1

Yep. Success. Phuhh.
[root@s1 /]# gluster volume start myvol1
volume start: myvol1: success

[root@s2 etc]# gluster volume list

myvol1
[root@s2 etc]# gluster volume status
Status of volume: myvol1
Gluster process                             TCP Port  RDMA Port  Online  Pid
------------------------------------------------------------------------------
Brick s1:/gluster/brick1/mpoint1            49152     0          Y       2528
Brick s2:/gluster/brick1/mpoint1            49152     0          Y       10033
NFS Server on localhost                     2049      0          Y       10054
Self-heal Daemon on localhost               N/A       N/A        Y       10061
NFS Server on 192.168.183.235               2049      0          Y       2550
Self-heal Daemon on 192.168.183.235         N/A       N/A        Y       2555

Task Status of Volume myvol1
------------------------------------------------------------------------------
There are no active volume tasks

[root@s1 ~]# gluster volume create myvol2 s1:/gluster/brick2/mpoint2 s2:/gluster/brick2/mpoint2  force
volume create: myvol2: success: please start the volume to access data
[root@s1 ~]# gluster volume start myvol2
volume start: myvol2: success
[root@s1 ~]# gluster volume info
Volume Name: myvol1
Type: Replicate
Volume ID: 633b765b-c630-4007-91ca-dc42714bead4
Status: Started
Number of Bricks: 1 x 2 = 2
Transport-type: tcp
Bricks:
Brick1: s1:/gluster/brick1/mpoint1
Brick2: s2:/gluster/brick1/mpoint1
Options Reconfigured:
performance.readdir-ahead: on

Volume Name: myvol2
Type: Distribute
Volume ID: ebfa9134-0e6a-40be-8045-5b16436b88ed
Status: Started
Number of Bricks: 2
Transport-type: tcp
Bricks:
Brick1: s1:/gluster/brick2/mpoint2
Brick2: s2:/gluster/brick2/mpoint2
Options Reconfigured:
performance.readdir-ahead: on

On the client:

[root@c1 ~]# wget -P /etc/yum.repos.d http://download.gluster.org/pub/gluster/glusterfs/LATEST/CentOS/glusterfs-epel.repo
[...]
[root@c1 ~]# yum -y install glusterfs glusterfs-fuse
[....]
[root@c1 ~]# mkdir  /g{1,2}
[root@c1 ~]# mount.glusterfs s1:/myvol1 /g1
[root@c1 ~]# mount.glusterfs s1:/myvol2 /g2
[root@c1 ~]# mount
[...]
s1:/myvol1 on /g1 type fuse.glusterfs (rw,relatime,user_id=0,group_id=0,default_permissions,allow_other,max_read=131072)
s2:/myvol2 on /g2 type fuse.glusterfs (rw,relatime,user_id=0,group_id=0,default_permissions,allow_other,max_read=131072)
[root@c1 ]# df -h
Filesystem               Size  Used Avail Use% Mounted on
/dev/mapper/centos-root   28G  1.1G   27G   4% /
devtmpfs                 422M     0  422M   0% /dev
tmpfs                    431M     0  431M   0% /dev/shm
tmpfs                    431M  5.7M  426M   2% /run
tmpfs                    431M     0  431M   0% /sys/fs/cgroup
/dev/sda1                494M  164M  331M  34% /boot
tmpfs                     87M     0   87M   0% /run/user/0
s1:/myvol1               9.0G   34M  9.0G   1% /g1 [9G,9G because of replicating (aka RAID1 over network))
s2:/myvol2                18G   66M   18G   1% /g2 (9G+9G because of distributing (aka JBOD over network))

What is the difference between distributing and striping? Here are two short sniplets from glusterhacker blog:
Distribute : A distribute volume is one, in which all the data of the volume, is distributed throughout the bricks. Based on an algorithm, that takes into account the size available in each brick, the data will be stored in any one of the available bricks. [...] The default volume type is distribute, hence my myvol2 got distributed.
Stripe: A stripe volume is one, in which the data being stored in the backend is striped into units of a particular size, among the bricks. The default unit size is 128KB, but it's configurable. If we create a striped volume of stripe count 3, and then create a 300 KB file at the mount point, the first 128KB will be stored in the first sub-volume(brick in our case), the next 128KB in the second, and the remaining 56KB in the third. The number of bricks should be a multiple of the stripe count.

The very useable official howto is here.
   
Performance test, split brain, to be continued....

2016. április 7., csütörtök

Ban / reject users with freeradius based on MAC addresses

Freeradius is a common tool if someone wants to set up an enterprise WiFi authentication. But if it's in a public institude, e.g. a school, sooner or later your WiFi users' passwords will leak out and after password changes your logs get full of incorrect logins from the mischievous studends. Solution: build a script that scan the logfile for incorrect logins and ban the MAC addresses of those devices. Here is a little help on how to start thinking:
add the following to your /etc/freeradius/modules/files

files rejectmac {
                key = "%{Calling-Station-ID}"
                usersfile = ${confdir}/rejectmacaddress.txt
                compat = no
        }


add the following to authorize{} section of your /etc/freeradius/sites/sites-enabled/default

rejectmac
        if (ok) {
            reject
        }


create a new file /etc/freeradius/rejectmac.conf and add 
passwd rejectmac {
  filename = /etc/freeradius/rejectmacaddress.txt
      delimiter = ,
      format = "*Calling-Station-Id"
}


create a new file /etc/freeradius/rejectmacaddress.txt and fill it with the kiddies MACs like this
78-F8-82-F3-8F-58,B4-CE-F6-4D-74-93,B0-45-19-C6-17-D1,50-F0-D3-1D-42-CE,00-5A-05-90-08-FE,88-07-4B-D1-17-15

add this to the beginning of your radiusd.conf
$INCLUDE rejectmac.conf

restart your freeradius daemon and get ready to go home.


2016. április 6., szerda

Debian Wheezy Mail Server – Postfix Dovecot Sasl MySQL PostfixAdmin and RoundCube

Shamefully I didn't want to find my own way so the whole tutorial I followed is here.
For my personal further usage, I attached the working nginx, dovecot, postfix and php5 config to this post. There are two minor differences from the original tutorial: I don't use spam filtering because at me it's done by a 3rd party provider. Second, I use an outgoing TLS smarthost via mail submission 587 port, detailed in the postfix/main.cnf.
Note that sensitive infos are all removed and in the tgz there is a missing sock, obviously, because sockets can't be packed. (tar example/php5/fpm/socks/ssl_example.com.sock: socket ignored.)
Follow the original howto first.

Versions for my pack are:
Linux box 3.2.0-4-amd64 #1 SMP Debian 3.2.73-2+deb7u3 x86_64 GNU/Linux
ii  nginx                              1.2.1-2.2+wheezy4                 all          small, powerful, scalable web/proxy server
ii  nginx-common                       1.2.1-2.2+wheezy4                 all          small, powerful, scalable web/proxy server - common files
ii  nginx-full                         1.2.1-2.2+wheezy4                 amd64        nginx web/proxy server (standard version)
ii  dovecot-common                     1:2.1.7-7+deb7u1                  all          Transitional package for dovecot
ii  dovecot-core                       1:2.1.7-7+deb7u1                  amd64        secure mail server that supports mbox, maildir, dbox and mdbox mailboxes
ii  dovecot-gssapi                     1:2.1.7-7+deb7u1                  amd64        GSSAPI authentication support for Dovecot
ii  dovecot-imapd                      1:2.1.7-7+deb7u1                  amd64        secure IMAP server that supports mbox, maildir, dbox and mdbox mailboxes
ii  dovecot-ldap                       1:2.1.7-7+deb7u1                  amd64        LDAP support for Dovecot
ii  dovecot-lmtpd                      1:2.1.7-7+deb7u1                  amd64        secure LMTP server for Dovecot
ii  dovecot-mysql                      1:2.1.7-7+deb7u1                  amd64        MySQL support for Dovecot
ii  dovecot-pgsql                      1:2.1.7-7+deb7u1                  amd64        PostgreSQL support for Dovecot
ii  dovecot-pop3d                      1:2.1.7-7+deb7u1                  amd64        secure POP3 server that supports mbox, maildir, dbox and mdbox mailboxes
ii  dovecot-sieve                      1:2.1.7-7+deb7u1                  amd64        sieve filters support for Dovecot
ii  dovecot-sqlite                     1:2.1.7-7+deb7u1                  amd64        SQLite support for Dovecot
ii  postfix                            2.9.6-2                           amd64        High-performance mail transport agent
ii  postfix-mysql                      2.9.6-2                           amd64        MySQL map support for Postfix
ii  php5-common                        5.5.33-1~dotdeb+7.1               amd64        Common files for packages built from the php5 source
ii  php5-fpm                           5.5.33-1~dotdeb+7.1               amd64        server-side, HTML-embedded scripting language (FPM-CGI binary)
ii  php5-imap                          5.5.33-1~dotdeb+7.1               amd64        IMAP module for php5
ii  php5-intl                          5.5.33-1~dotdeb+7.1               amd64        internationalisation module for php5
ii  php5-mcrypt                        5.5.33-1~dotdeb+7.1               amd64        MCrypt module for php5
ii  p
hp5-mysql                         5.5.33-1~dotdeb+7.1               amd64        MySQL module for php5


2016. március 9., szerda

Ubiquiti Unify nuisances and the attack of the Martians

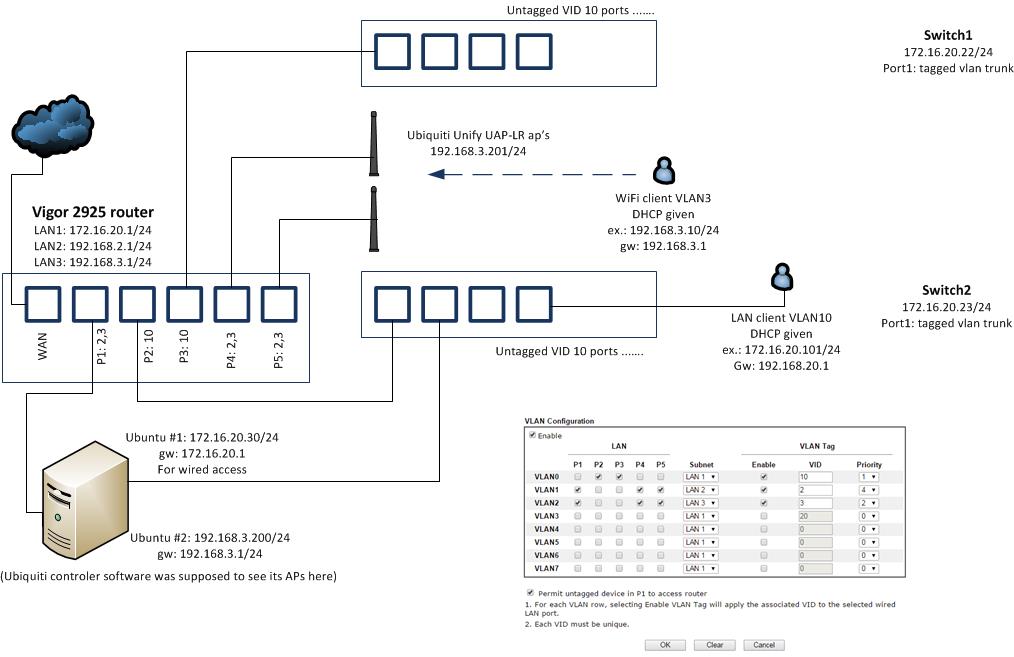
Some weeks ago I was given a nice task. A client of ours wants us to set up two new Unify APs in its network with two new wireless networks: one for guest and one for internal use. They had a Vigor 2925 to be used for firewall and DHCP role. For those who are not familiar with the wireless products named ubiquiti unify APs, here are a few links to inform:
How do I configure a "Guest Network" on UniFi AP?
Instructive reading. Based on the infos here I finally decided not to use the internal "firewall" in the APs and let the Vigor do the network separation.
UniFi - Does the controller need to be running at all times?
Official answer says "no, most of the times it is not necessary." Unfortunately this isn't entirely true with the latest firmwares. :/
No worries, since the client already had a Linux server, it looked so simple to install the controler software and setup the nodes. Sadly, everything went a different way.
For a mystical reason I couldn't make the controller software, running on the Linux, see its APs, even they were in the same subnet by their IPs and in the same broadcast domain, for the sake of Layer2 communications. I spent two days just on this riddle. Maybe it was a misconfiguration of the D-Link switches or maybe an insolvable incompatibility issue. I don't know why to this very day. :( I tried everything but the time run out so I had to find a quick solution.
So I decided to use a different network card and a second subnet on the Linux only to control the APs.
I ended up with this config:
My interfaces were:
em1       Link encap:Ethernet  HWaddr 00:25:90:xx:xx:xx
          inet addr:172.16.20.30  Bcast:172.16.20.255  Mask:255.255.255.0
          inet6 addr: fe80::225:90ff:fed3:930c/64 Scope:Link
..
em2       Link encap:Ethernet  HWaddr 00:25:90:xx:xx:xx
          inet addr:192.168.3.200  Bcast:192.168.3.255  Mask:255.255.255.0
          inet6 addr: fe80::225:90ff:fed3:930d/64 Scope:Link
..
lo        Link encap:Local Loopback
          inet addr:127.0.0.1  Mask:255.0.0.0
..

APs looked working. I think Connected(limited) state is normal in this case. Note that I didn't use the built-in "guest network" feature because it's just ridiculous.


 So everything seemed properly set. But to my greatest astonishment I coudn't reach network share of my server lying on 172.16.20.30 from my internal wifi client 192.168.3.11. When I started to ping and tcpdump'ed on the server I saw that echo requests came in but replies never went back. I thought to myself: Seeing the fact that the kernel wanted to reply on the other interface (192.168.3.x) it's hardly surprising that it didn't work.
So I set IP policy routing: if the packet comes from 192.168.3.11 on em1, reply to it on the same interface -em1- instead of em2. You know, all the iptables mangle MARK and ip route add default via 172.16.20.1 dev em1 table ... stuff, etc. etc. etc.
It didn't work either. Suddenly a light dawned on me. I turned on kernel martian packet logging with echo 1 > /proc/sys/net/ipv4/conf/all/log_martians
and VOILA I saw:

Mar  2 20:08:03 superserver kernel: [ 2755.407570] IPv4: martian source 192.168.3.11 from 192.168.3.200, on dev em1
Mar  2 20:08:03 superserver kernel: [ 2755.407590] ll header: 00000000: ff ff ff ff ff ff 00 25 90 d3 93 0d 08 06        .......%......
Mar  2 20:08:04 superserver kernel: [ 2756.424025] IPv4: martian source 192.168.3.11 from 192.168.3.200, on dev em1
Mar  2 20:08:04 superserver kernel: [ 2756.424048] ll header: 00000000: ff ff ff ff ff ff 00 25 90 d3 93 0d 08 06        .......%......
Mar  2 20:08:05 superserver kernel: [ 2757.421639] IPv4: martian source 192.168.3.11 from 192.168.3.200, on dev em1
Mar  2 20:08:05 superserver kernel: [ 2757.421661] ll header: 00000000: ff ff ff ff ff ff 00 25 90 d3 93 0d 08 06        .......%......

It's a bit confusing isn't it ?!?! 192.168.3.200 is my own server!
I tried to turn off the Martian protection with echo 0 > /proc/sys/net/ipv4/conf/all/rp_filter
but I learned: such a bad routing problem can not be solved with a simple fix like this.
I was thinking very hard for an hour and finally I faked the kernel with an another subnet set on my second interface:

auto em2
iface em2 inet static
    address 192.168.3.200
    netmask 255.255.255.192


Now it's working as expected:
root@:/# route -n
Kernel IP routing table
Destination     Gateway         Genmask         Flags Metric Ref    Use Iface
0.0.0.0         172.16.20.1     0.0.0.0         UG    0      0        0 em1
172.16.20.0     0.0.0.0         255.255.255.0   U     0      0        0 em1
192.168.3.192   0.0.0.0         255.255.255.192 U     0      0        0 em2

These were all done on a:
Linux 3.11.0-12-generic #19-Ubuntu SMP Wed Oct 9 16:20:46 UTC 2013 x86_64 x86_64 x86_64 GNU/Linux

2016. január 25., hétfő

Three small scrips

Hey there, long time no see. Nothing special news here, just wanted to see googlebots heading here. So here comes my first new year post, 3 minor scripts. First one is for Exchange: adds new email aliases for users from a .csv and makes it default address.

Import-Csv c:\scripts\data.csv -Header UZER,ADDRZ| Foreach{
Set-Mailbox $_.UZER -EmailAddressPolicyEnabled $false
   $user = Get-Mailbox -Identity $_.UZER
   $user.EmailAddresses+=$_.ADDRZ
   Set-Mailbox $user -PrimarySmtpAddress $_.ADDRZ
}


example of data.csv: (without any headers!)
mgibson,mel.gibson@mighty.com
ctom,tom.cruise@mighty.com
cjoe,joe.cool@mighty.com


Second one is a bit tricky. I wanted to list all my distribution groups and their members. There are lots of solutions for this, e.g. you can find an edifying blog entry here. Unfortunatelly most of these scripts don't work nowadays at Office365 Exchange because of this unpleasing nastiness:
Cannot process argument transformation on parameter 'Identity'. Cannot convert value to type "Microsoft.Exchange.Configuration.Tasks.DistributionGroupMemberIdParameter". Error: "Cannot convert hashtable to an object of the following type: Microsoft.Exchange.Configuration.Tasks.DistributionGroupMemberIdParameter. Hashtable-to-Object conversion is not supported in restricted language mode or a Data section."                                                       
Explained on reddit by PsTakuu: It's not the object being passed into the Get-DistributionGroupMember by the pipeline that is causing the issue, it's that you are shoving an entire object into the first positional parameter (Identity) and it doesn't accept hash tables.
Here's a way to recreate your issue:
Get-DistributionGroup | select -First 1 | %{Get-DistributionGroupMember $_}
Here's the way to fix:
Get-DistributionGroup | select -First 1 | %{Get-DistributionGroupMember $_.identity} 

So here is the final working solution:
foreach ($group in Get-DistributionGroup) { get-distributiongroupmember $group.displayname | ft @{expression={$_.displayname};Label="$group"}}
The results can be redirected to file like this: $( foreach (............) )|out-file file.txt
or
$result = foreach (...)
$result | out-file file.txt -append

A +1 powerlist, for bonus: 
Get-DistributionGroup|format-table -wrap -property name,emailaddresses,hiddenfromaddresslistsenabled,RequireSenderAuthenticationEnabled > c:\groups.txt

 The third supersimple linuxer script adds users to a linux system and into samba fileserver database. I don't care about real names, room numbers and so on. That also creates tricky .bat files to make it easier to attach the network drive to windows users later.

#!/bin/bash
while read line; do
uzer=$(echo $line|cut -d ':' -f1)
pazz=$(echo $line|cut -d ':' -f2)
useradd -p $(openssl passwd -1 $pazz) $uzer --shell /bin/false --no-create-home --no-user-group
echo -ne "$pazz\n$pazz\n" | smbpasswd -a -s $uzer
echo "cmdkey /add:192.168.85.254 /user:workgroup\\$uzer /pass:$pazz" > /root/batz/$uzer.bat
echo "net use m: \\\192.168.85.254\\workz /P:Yes" >> /root/batz/$uzer.bat
done < users.txt

example of users.txt:
melbigson:jydac3sS
tomcruise:hEieafS
joecool:nhi252ax